Okay, so I'm sure you've already heard of snow globes that are made
out of mason jars. And baby food jars. And any other kind of jars that you can imagine.
But have you heard of snow globes that are made out of old gumball machines? Well I'm here to tell you that this is THE way to do it!
This post contains affiliate links. A purchase of any one of these items helps to support this blog and its creative efforts at no cost to you. To read more, please see my disclosure page.
I'm so excited to be participating in a blog hop sponsored by Hometalk.com and CountryLiving.com. The theme is "Home For Christmas" and we all know that I L-O-V-E to decorate my home for Christmas, right? I actually think that might be an understatement!
Right after Christmas last year I saw my inspiration and could not WAIT to try it out for myself. Rebecca over at The Crafted Sparrow created a waterless snow globe out of an old gumball machine, and I just absolutely had to make one for myself! I already had a thrift store gumball machine. But I had to wait almost a year before I could put the project to the test. Luckily, good things come to those who wait. I have to say that I'm pretty excited with how it all turned out.
I wanted to recreate Rebecca's vintage charm for myself, so I got to
work.
How To Make A Gumball Machine Waterless Snow Globe
Faux snow (or Epsom salts)
cardboard
scissors
screwdriver to disassemble machine
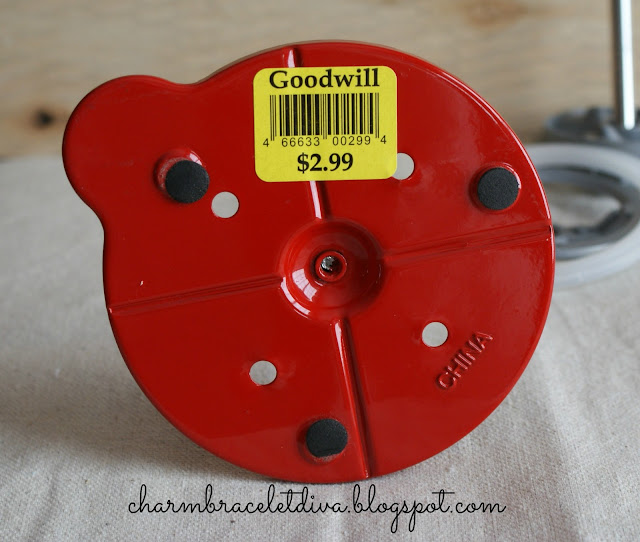
Here's the gumball machine I picked up at Goodwill for $2.99. (I am finding
new ones selling online for $40.00.) I got it for the kids a few years
ago but never really did anything with it. I've always loved the pop of red it provides.
Now first things first. You need to take the thing apart.
Once you do that you're left with this.
These are the "outside" parts. You'll also have some "inside" parts.
All the pieces shown above come out. One of the pictures actually shows the bottom of the machine. You can choose to leave that on or take it off. Either way you'll want to unscrew the metal pole that runs down the center of the machine and take it out. It would kind of cramp your style if you didn't. The "globes" are pretty small and you'll want all the room you can get inside of it to work with.
Here's the top before taking out the pole.
And here's the bottom piece I told you about. You can choose to leave it on or take it off. Either way it won't affect the look of the snow globe. However, since you'll be taking out the center pole, the bottom piece won't have anything to keep it secure and in place anymore. The machine will just be "sitting" on it.
There is one plastic piece you'll want to leave inside the machine. The only problem is that it does not completely cover the entire inside. There's a gap that has to be filled before you start pouring in your faux snow and putting in the little Christmas figurines.

Here's the semicircle piece of cardboard I cut out to fill the empty space not covered by the plastic insert. I just laid the plastic insert on a piece of paper and traced the outline of the open space that needed to be filled. I cut that out and taped it inside the empty space with masking tape.
And voila. Here it is after I added the cardboard semicircle and the masking tape. Once that's complete you can place the globe back on top and pour in some snow. Note that both of my globes had their own graphics on them ("Jelly Belly" and "Bazooka"). There was no way for me to remove them without scratching the heck out of the globes so I chose to just leave them on. Obviously you're going to want to turn that part to the back.
Now it's time to have some fun and add the tiny and oh-so-cute Christmas items.
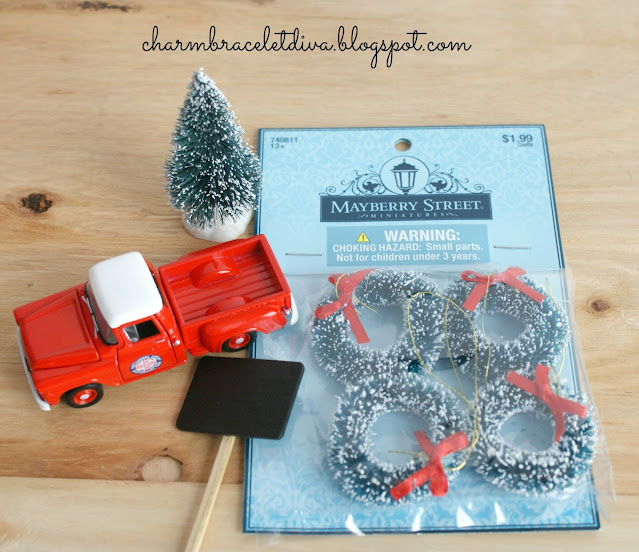
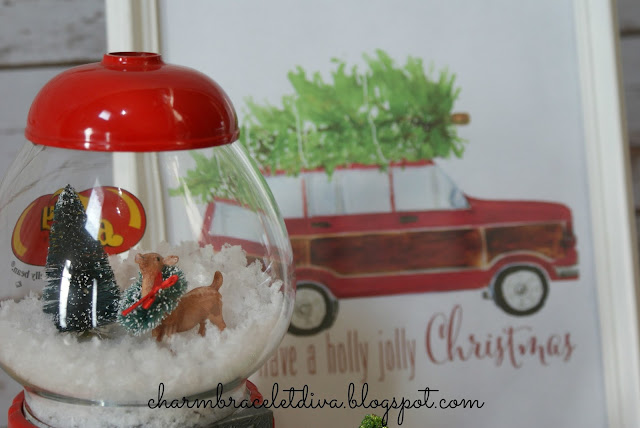
For the first (red) snow globe (didn't I tell you -- I made TWO? As luck would have it I found another one at Goodwill later in the year!) I chose a tiny deer with a wreath around its neck and a bottle brush tree. I got the deer at Michael's and the teeny wreaths (they're actually ornaments) at JoAnn's. I got the sparkly metallic green bottle brush tree for less than a dollar at Wal-Mart.
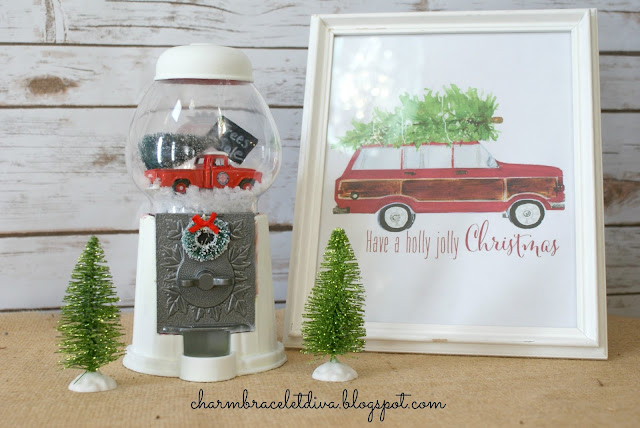
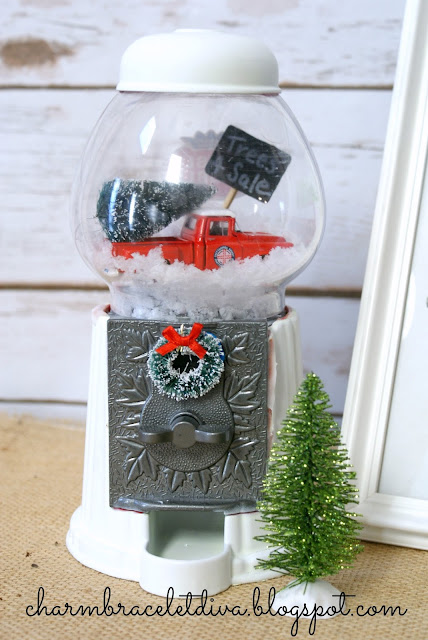
For the second (white) snow globe I added a red truck from Wal-Mart, a tiny bottle brush tree, and tiny wreaths for both the front of the truck and for the front of the snow globe (in the coin slot). I also made a tree farm sign using white chalk that says "Trees 4 Sale." The sign is a cupcake topper I got in a package from the dollar bin at Target a while ago. I wrote on it with a chalk pen. (That was before I learned that you can sharpen chalk!)
Here's the bag of faux snow I used. I got mine at either Hobby Lobby or JoAnne's. You can also use Epsom salts which you might just already have lying around the house. Epsom salts actually look awesome as faux snow, I've used them before and they work just as well as "snow flakes." You can pick some up pretty inexpensively at the grocery store, Target or pharmacy. (No, Target does not pay me to advertise for them, but they should, right?)
I forgot to mention that both my snowball machines were red. Which is perfect for Christmas. But I really had that white one stuck in my mind from last year's inspiration. So after much hemming and hawing I spray painted one of them white, just for some contrast with the red one.
Here's the red one.
And here's the white one.
The fabulous woody station wagon watercolor painting you see in the background was painted by none other than the very talented Lucy over at Craftberry Bush. Hop on over to visit her blog where you can download the graphic, as well as many other equally amazing graphics. Just be sure to use them for personal use only. I love placing mine all around the house.
I love the vintage look of these machines.
It's official. I've become totally obsessed with miniature deer!
Okay, so he looks a bit sinister here.
I hope I've given you some inspiration of your own. If you don't have a
bubble gum machine I'm sure you can come up with an alternative container
for your own waterless snow globe. I may be sharing a few more of my
unique snow globe creations over the coming weeks.
Stay tuned for more DIY Christmas projects.....
it's the most wonderful time of the year!
Be sure to stay in touch:

Please be sure to check out all the projects linked up
below and give my talented blogging friends some love!












Leave a Comment!
Oh my gosh, Kathleen, it's fantastic!! SO creative and perfectly executed. They are just wonderful :)
These are SO adorable - gotta find myself a gumball machine now - pinned it!
~Angie
How cute are these?! What a fun and fresh idea for a snow globe project!
Great idea! These are so cute!
So incredibly cute! I love this so very much. I painted mine mint green a couple years ago and filled it with pistachios. I need to try this now!!
These are the cutest! Love them!
Love this DIY!!! They turned out so cute!!!
What a fantastic idea!! Love this waterless snow globe!!
Kathleen,
I love it and it's different! Great idea and if this was at the store I would buy one.
What a cute snowglobe! I've never seen one made from a gumball machine before. Clever!
You are the miniature Christmas vignette queen! I won't be passing up any gumball machines in my future thrifting hunts. ;o)
What a terrific use for the gumball machines the red is perfect for the season and you've made the cutest vignettes in each one. Best ~ Mickie
this is so cute! LOVE this idea so much! You better believe if I see gumball machines at goodwill I will be snatching them up! :)
Oh my goodness... I couldn't love this project more if I tried! Soooo adorable!
Kathleen these are simply adorable. I know I will be on the lookout for a gumball machine now. Cathy
I'll never pass up one of those store a thrift store ever again! Thank you!
Hi Kathleen,
So creative and so cute, I just love these!
I am loving everything snow globe this year and everything miniature inside! Cute!
Kimberley
Those are absolutely ADORABLE - such a clever idea! I especially love the one with the truck displaced under your artwork - too cute. Pinned to share :)
What an ingenious idea! Love this project to pieces.
Oh Kathleen! LOVELY! and 2.99!? what a find! I'm officially on the hunt for gumball machines now! :)
xo
Lacey
www.featheringmynest.ca
What a fantastic craft project for Christmas!!
I just love these! They turned out so beautifully!
Kathleen, I used to have the same gumball from when my kids were younger. Yours is so adorable--I'm kicking myself for getting rid of it! Love it!
Will be scouring thrift stores for gumball machines now. Vintage love going on for these. Great project!
These are so adorable! What a fun idea for a gumball machine!
Hugs,
Pili
Kathleen, these are SOOO cute! You sure live by a great Goodwill! haha Thanks for sharing! Cynthia
Kathleen, These are so stinkin cute! Now I have to find a gumball machine.
Happy Holidays to you and your family.
Sherry
How totally adorable Kathleen! Featured you at Be Inspired this morning. Thanks so much for sharing!
I remember these when you posted them...goodness, has it already been 2 years ago? I can see why it's your most viewed post b/c these are just adorable, and every time I see one when I'm out & about, I seriously think about you every time Kathleen! It was that memorable!
I don’t know if you monitor this link or not anymore, but I was wondering how did you glue down or fix down your objects inside the globe on top of the cardboard, was it glue? Or not at all? Thank you
Post a Comment