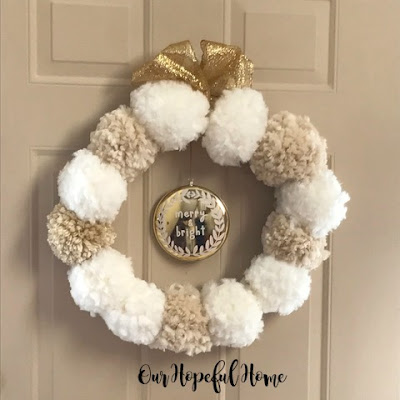
Years ago I fell in love with Anthropologie's pom pom wreath the moment I set eyes on it. Who wouldn't? But due to its astronomical price I knew that baby was never coming home with me. However, luckily for me, I also knew that I could actually DIY one for a lot less money!
*This post contains affiliate links (Materials List in gold, below). A purchase of any of these items helps to support this blog and its creative efforts at no cost to you. To read more, please see my disclosure page.
The wreath has already shown up on the blog in my pom pom garland tutorial post.
Here it is hanging on the inside of our front door in the foyer. You can kind of see that I placed a gold bottle brush tree and gold woody station wagon ornament on it for effect. But I digress. Today I want to show you how you can make your own Anthropologie-inspired pom pom wreath. So here goes.
HOW TO MAKE AN ANTHROPOLOGIE-INSPIRED POM POM WREATH
Materials
1. Extra Large pom pom maker (or 4"x 4" cardboard square)
2. Two 27-yard skeins of chunky yarn (makes 8 large poms) plus enough chunky yarn of another color to make 5 large poms
3. Wire wreath form (not shown) -- mine is 18" in diameter
4. Scissors (not shown)
5. Wide ribbon
6. small ornaments/bottle brush trees, etc. for embellishment if desired
I forgot to take a picture of the wire wreath form, but here's the tag from it. I got mine at Joanne's at 40% off. You can also get one at the Dollar Store but they don't always have them and they might not have the size you want. Mine was 18" in diameter. You'll notice that the tag is sitting on top of a 4" cardboard square. Originally that is what I used to make the pom poms, before I bought the pom pom maker.
It's key that you use chunky yarn. I know that chunky yarn comes in chenille but I would not recommend that. Just plain chunky yarn is best. The chunkier the better! My white yarn was super chunky as seen here. The tan yarn, however, was something I had on hand and it was a bit less chunky but I still made it work.
Here's a close-up of the actual pom pom maker package. For this project I bought the Extra Large size. I have to say that at first I had a bit of trouble understanding how the thing works, but after watching a few Youtube videos I got the hang of it. Truth be told, I really didn't find that the poms I made with it were in any way significantly better than the ones I made with the cardboard square. Go figure. (Hint: Save yourself some money and use the cardboard.)
First: How To Make Your Own Pom Poms
1. If using the cardboard square method, wrap the yarn around the square 35 times, being sure to distribute the yarn evenly from side to side across the square. Cut it loose from the skein.
2. Cut an 8 inch or longer piece of yarn.
3. Gently and carefully slide the wrapped yarn off the square and place it flat on the table, placing your 6 inch piece of yarn underneath and around its middle.
4. Tie that 8 inch piece of yarn into a very tight knot, basically creating a puff ball of yarn.
5. Using your scissors, slowly and methodically start cutting through the loops of the puff ball until all loops have been cut through. Trim ends as necessary.
6. Puff and fluff as needed. Repeat steps 1-6 for 8 white pom poms and 4 beige/tan/gold/whatever other color you want pom poms.
7. If using the pom pom maker, watch some Youtube videos before getting started. I really think watching a video or two will make it easier for you in the long run. Following the directions, make 8 large white pom poms and 4 large beige/tan/whatever other color you want pom poms.
Second: How To Make The Pom Pom Wreath
After all the pom poms are made, it's time to arrange them on your wire wreath form. I've seen it done with straw wreaths and upholstery pins which is also an option. However, the wire wreath was less expensive and did not require any special pins or whatnot in order to attach the pom poms to it.
I just used the "tails" of yarn (the two pieces left over from the yarn you used to tie off your pom pom) and tightly tied each pom pom onto the wire ring, all the way around.
I then added a big bow at the top made with wide, wired, glittery ribbon. I also added a gold over-sized ornament in the center of the wreath.
I originally used two black and white plaid ribbons to hang the wreath from, which worked fine in the kitchen. But when it came to the foyer I changed my mind and went with the gold embellishments for more of an elegant, glamorous look.
I'm really pleased with how the wreath turned out, and I'm definitely glad that I finally got around to making it! I suspect that we'll be enjoying it well past Christmas and into the winter for sure.
Well, that's it until next time, friends!
I hope you enjoyed reading about
my Anthropologie-Inspired
Pom Pom Wreath for Christmas
and that I've inspired you in some way.
Don't forget to Pin it!


Leave a Comment!
That's so pretty! Looks easy to make too. Thanks for sharing.
I LOVE that Kathleen! It looks so soft. I've thought about getting a pom pom maker, but I think I might try your cardboard method first. Thanks for telling about the chunky yarn. The wreath is perfect!
So cute!
Post a Comment