The words "mini bunting" sure do make me smile. I mean, anything with the word
"mini" in it has to be cute, right? In this case I'd definitely say yes.
Mini bunting is super easy to make, and you probably already have what you
need to make one.
Mini bunting is super easy to make, and you probably already have what you
need to make one.
I started out with some cotton string.
Then I picked out two fabrics that I thought would go well together:
solid orange and polka dot.
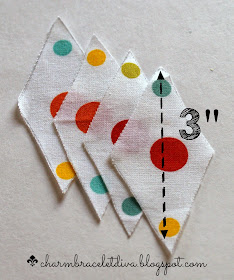
I cut a three inch tall diamond out of cardboard as my template. Then I traced
as many diamonds as I needed to fit across the vintage frame I planned to
hang the bunting on.
as many diamonds as I needed to fit across the vintage frame I planned to
hang the bunting on.
To figure out the size of each individual finished pennant (triangle), just halve the size of the unfolded diamond. For example, in this case, the diamond is 3 inches tall. So each actual mini bunting pennant (triangle) will be 1 and 1/2 inches tall (or half). Tailor the size to whatever you'll be hanging the bunting on. For something larger than my frame, like a mantel, you would just make your diamond template larger to account for the larger area it will be hung on. It's up to you to decide the proportions.
Materials
string
fabric
cardboard (for template)
Stitch Witchery
(from JoAnn's, Michael's or Wal-Mart)
iron
Easy to Follow Instructions:
1. Draw a diamond-shaped template on cardboard. Cut out template.
2. Trace your template onto the fabric for every triangle pennant you think you'll need.
3. Cut out the diamonds.
4. Fold each diamond in half, making a crease at the top.
5. Iron each triangle with a small piece of Stitch Witchery between the two pieces of the fabric near the point of the triangle, or bottom of the pennant. Follow the directions on the package. This will hold the pennant triangles together. Make sure to leave enough room at the top of the triangle to allow a string to be threaded through it.
6. Carefully thread your string through all the triangles, space them out evenly, and hang your bunting!
In case you missed it, I shared this reverse chalk transfer quote,
Do YOU have any favorite quotes
you'd like to see on a chalkboard?
Stay in Touch @
Facebook.com/CharmBraceletDiva
Pinterest.com/charmbdiva
Twitter.com/CharmBDiva
Bloglovin
Enter your email address in the box below
Don't miss another
thrifty
DIY
home decor post!


I've seen tiny bunting made with Washi tape but not with fabric! What an adorable idea! I might try this!
ReplyDeleteSuper cute bunting, love the fabric! I pinned to try later!
ReplyDeleteI have got to make your adorable mini- bunting. I have some orange fabric like linen but not the polka dot which really makes me think of Easter and Spring. Perfect. I usually hang my garland/buntings from under shutter shelf which stands in for my mantel. It's such fun to decorate it whenever I get the urge to change or for seasons, holidays. It's hanging over our sofa.
ReplyDeleteYour bunting is very Spring like, looks so pretty hung on your frame. I have couple big frames I could hang one in our bathrooms or in hallway. To date I've only done one chalk board and rarely use it, forget to.
Don't really have that much wall space to hang them on. It's just us two old folks so don't need one to remind people about things. Don't think I seasoned it right either.
I Love seeing all the wonderful chalk board designs many of you do, very creative and they look so great. I spend alot of my time reading blog posts so don't have as much time to make things, that and cleaning house, doing laundry. Don't know how two people could make so much of it. Makes me wonder how I managed when we had 4 kids at home and I worked full time. Have great rest of week.
Thank you for sharing
ReplyDeletethis sweet tutorial. I'm
pinning away for later.
I think it would be so cute
tied to skewers on a cake,
too!
xo Suzanne
This is adorable! Thanks for such a great tutorial! I love your vignette! Your chalkboard is so cute!
ReplyDelete
ReplyDeleteit's so little and cute
I want to comment on a few posts ago about that sweet altered necklace you made, I think I have also same pieces and going to give it a try.I use to make a lots of charm necklaces and see a lot on blogs guess we have all moved onto little banners LOL
This is such a sweet little project. I'm adding string to my shopping list. xoxo
ReplyDeleteThat is adorable! Thanks for sharing at Home Sweet Home!
ReplyDeleteSherry
oh my gosh Kathleen! I am in love with your mini bunting! Great tutorial. Thanks for linking up and linking back to My Repurposed Life link party!
ReplyDeletecatching you this week!
gail