It all started with a couple of lamp shades. Target's clearance section was calling out to me.... and of course I had to follow the call. Little did I know when I bought two turquoise lamp shades that day that I was about to change our every day decor for the first time in almost 12 years. I have always played it pretty safe both color and style-wise, tending to go with muted tones and a traditional farmhouse style. But this time I guess I was ready for a change, and, well, I just fell in love with the color.
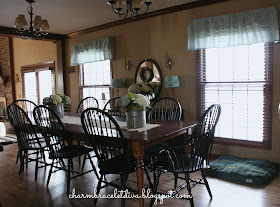
Before I started changing things out, our kitchen eating area looked like this.
This picture is actually the real estate photo from when the house was up for sale. It's normally not this clean and bright and, well, showroom perfect. But this day it was. You can see the toile valances on the windows. But what you might not be able to see is that the lamp shades were the same matching toile as well. As much as I loved them, I was finally ready for a change, thanks to those darn new turquoise lamp shades.
I apologize in advance for the bad lighting in my photos. This is one part of the house that is almost impossible to get a good picture of because of the lighting. Anyway, the toile curtains looked out of place with the new lamp shades so I knew I'd have to do something about that eventually. But I have a real fear of curtains and all that goes along with them. So I really had no idea what I would do to replace them, until I found a brand new full length Target curtain panel at Goodwill for $3.99.
The single panel measured 54" x 84" (their price: $19.99). As soon as I laid eyes on it I knew that I had to bring it home and put it to good use. It was just too coincidental that it matched the new lampshades. It was a different pattern but the same color. They call these Greek Key curtains in Dream Blue. I call them turquoise.
First I took down the old valance and spread it out flat over the new panel to use as a template of sorts. Just to be safe I added two inches all around and then cut the panel fabric to pretty much match the template, but for those two extra inches (so my valance material was a bit larger than the template). The long side of the curtain panel was it's own straight edge, but for the bottom of my valance I measured down two inches from the bottom of the template and then drew a straight line in chalk all the way across the bottom from one side to the other.
Here you can see the top portion of the panel cut away from the main portion, using my original valance as a rough template. My original valance had a wavy effect going on across the bottom. I opted for the safer route and just made my new valance a straight rectangle all around. BEWARE: you will need more fabric than you think! My windows measure 44" from the outer portion of one window frame to the other. For that I needed 82" of fabric! That's because once you begin schrunching it up along the curtain rod it starts to seem like less and less fabric. So err on the side of more! You can always shorten it if necessary. But if you'd prefer not to have the scrunched look you can always use less fabric.
Once the cutting was complete I hemmed the bottom with straight pins, and ironed in a crease. Then I took out the pins and filled the inside of the crease with Stitch Witchery fusible bonding web tape, following the package instructions.
I had hoped to be able to use one of the original pre-hemmed lengths of the panel to put my curtain rod through, but it was too narrow. So I had to rip out the stitching with my handy dandy seam ripper and fold the fabric back down to create a new and wider top "hem" to put the rod through. After that, all it took was another strip of Stitch Witchery to finish off the top rod pocket and voila. But be sure to leave enough room for the rod!
I really feel like it creates a whole new look in the room.
One day I hope to have the walls painted gray and the trim white, in addition to switching out the brown wooden slat blinds for more neutral ones. What do you use for window coverings/treatments? These are basically floor to ceiling windows and I can't decide what might work best for them. I love plantation shutters but I think they would be a bit much for these tall windows.
As you can see, the lighting was not cooperating so the shade of turquoise varies in my photos. Grrr.
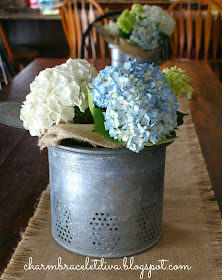
And I have to mention the gorgeous hydrangeas. Hydrangeas in winter, it doesn't get any better than that! They were a birthday and Valentine's Day gift from my husband. Twenty blooms that I had a fun time arranging in three different vases, starting with my white enamel farmhouse pitcher.
And do you remember my estate sale vintage galvanized minnow buckets?
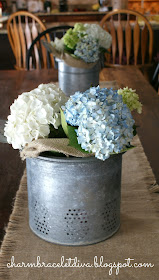
They made PERFECT vases for the hydrangeas!
I set them up on our farmhouse table, one at each end of a simple burlap table
runner and I'm just loving it!
The blue flowers compliment the turquoise lamp shades and curtains beautifully. It was like a match made in heaven. And since the valances only cost $3.99 to make (I already had the Stitch Witchery on hand), and the shades were on clearance, I won't feel guilty changing them out if I get bored with them somewhere down the line.
Beside the plans for someday painting this room and changing out the blinds, I hope to replace the black mirror with one of my large, gold vintage thrift store mirrors to add a little glam and brighten things up. That's shouldn't be a problem to switch out. Unlike the daunting task of painting a whole room. Baby steps.
Who would have thought that a tiny turquoise lamp shade could change my ideas about color and decorating? I certainly never saw myself as stepping outside my comfort zone and embracing bold color, but then look what happened.
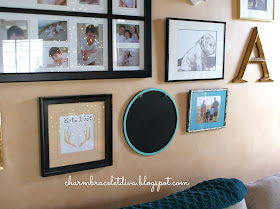
The color explosion has even spread throughout my home! This is a sneak peek into the family room where I've created my first gallery wall. It's almost done and I'll be sharing the final version of that project with you soon.
If you've read along this far thanks for sticking with me!
And be sure to come back this Thursday at 8 a.m. EST
for our fabulous Vintage Charm Party!
Hope to see you there!
Be sure to stay in touch!
Enter your email address in the box below
Don’t miss another
thrifty DIY
home décor
post!
I'll be linking up here:
I'll be linking up here:


I love your new lampshades. I have been drawn to that color for the past 6 months as well. How amazing that you were able to find a coordinating curtain at Goodwill. And aren't you so smart to then make your own valance?
ReplyDeleteWhen we moved into our patio home, I didn't want curtains and was on the lookout for valances. Instead I found a dozen napkins in a design that I loved. I then paid someone to turn them into valances. I love how they look.
Kathleen, as you might know I love anything that is quick and easy and you did a great job with your pretty new valances. It is exactly what I have been toying around with doing, but more of a cover up in my circumstances. Our living room valances are part of our rental property and need to stay. I just can't make up my mind on the fabric to use.
ReplyDeleteI think that you should go for the grey paint job and forget about painting the trim in white. Your beautiful brown farm table needs the brown trim to stay!
JP
Oh I how I love Target clearance! I've made multiple projects out of one of their clearance tablecloths ;) Love the lamp shades and your valances turned out great--can't beat the price!
ReplyDeleteWow, what a deal! Love the color and the new look. Thanks, Kathleen for sharing at Talk of the Town.
ReplyDeleteNice change-outs, Kathleen. I love turquoise as an accent color, too, and use it in our family, living, and master-bath rooms. I find it to be a very cheerful color. Nice work on your curtains; that stitch-witchery is pretty amazing :)
ReplyDeleteI love how your valances pull everything together in the room!
ReplyDeleteeasy and pretty... win/win!
thanks for sharing at Tallk of the Town!
gail
That turned out really cute Kathleen! Thanks for sharing at Home Sweet Home!
ReplyDelete