Remember when it seemed liked ALL the popular crafting/DIY blogs were hosting giveaways featuring some form of the Silhouette stencil machine? I was so excited to enter each and every giveaway, since who wouldn't want to win one of those awesome (not to mention expensive) crafting dynamos? Well, despite my best efforts at entering giveaways (and many times winning) I had zero luck winning the Silhouette machine. When that happens, what's a girl to do? I'll tell you what she does. She hunkers down, bucks the system, and does what any self-respecting DIY blogger would do. She learns how to make her own stencils sans Silhouette machine! Stick with me and I'll show you my step-by-step "How-To" tutorial for making your very own stencils.
Making your own stencils doesn't have to be expensive. As a matter of fact, it can be downright inexpensive, especially when you compare the cost of making them yourself with: 1. buying a Silhouette machine (and all its accessories and add-ons) or 2. buying premade stencils from online stencil designers or even from your local crafting store. The cost can really add up! I choose to go the simple and inexpensive route. You might not have all of these materials on hand but I'll bet you have a good number of them already.
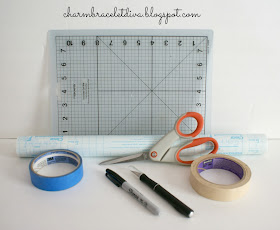
Materials For Making Your Own Stencils
You can get to each item below just by clicking on its name. I've provided the list for your shopping convenience. A purchase of any of these items helps to support this blog and its creative efforts at no cost to you. To learn more, please see my disclosure page.
You can get to each item below just by clicking on its name. I've provided the list for your shopping convenience. A purchase of any of these items helps to support this blog and its creative efforts at no cost to you. To learn more, please see my disclosure page.
*Self-healing cutting mat
*Detail Scissors
*X-Acto Knife
*Sharpie
*Roll of clear contact paper
*Masking tape or *Painter's tape
*A printed copy of your chosen graphic
Step 1. Find a Graphic
First, you'll want to pick a graphic. I'm obsessed with painting numbers, letters and words onto things, so I usually make some pretty straightforward stencils. My favorite website for free printable letters and numbers is SprayPaintStencils. On their home page click on "Alphabet Stencils" and then go the bottom part of that page and you'll see a heading entitled "Alphabet Stencils Free to Download." I like to use the very first one, creatively entitled "Alphabet Stencil." But you really can go wild with this and use as many fonts and words and designs as your little heart desires. My only caveat would be to start with simple designs, and work your way up to more intricate ones.
Step 2. Cut your contact paper to fit
completely over your graphic.
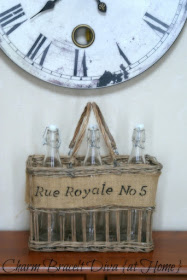
You can go one of two ways with this step. You can choose to lay the contact paper clear side up, or the other way around, with the printed side up. I tend to use it clear side up and I'll tell you why. Mainly because it makes it easier to see the graphic that's going to be slid underneath the contact paper for tracing purposes. The writing and lines on the printed side of the contact paper hopefully won't obscure the graphic you want to trace if you set out the paper up this way.{The contact paper I use in the example below was set up with the printed side face down. However, that stencil proved to be too small for my project, so I put it aside and made another, larger "5" and this time I wasn't paying attention and ended up using the contact paper the opposite way, with the writing side facing up as I traced. You can see what I'm talking about in the basket shot below.}
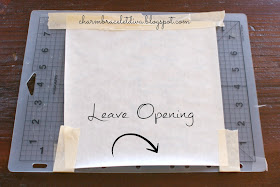
Step 3. Tape the contact paper down onto
your cutting mat, leaving room at the bottom to slide in your graphic.
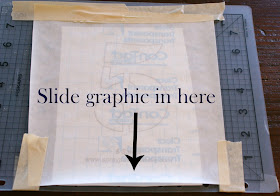
Step 4. Then slide the graphic in under the
contact paper.
Step 5. Using your Sharpie, carefully trace over the
outline of your entire graphic.
Step 6. Slide out the graphic before you
start cutting out the stencil.
And be sure to save it for future use! I have a file folder labeled "Stencils" and I try to keep everything I've ever used so that if the spirit strikes I can use them again. And believe me, since I use letters and numbers a lot I've been able to reuse many of them!
Step 7. Using your X-Acto
Knife, carefully apply pressure all the way around the Sharpie outline.
Once you're done cutting, gently pull out the pieces you've cut away from the image. You should be left with something like this. Ta da! Your very own stencil!In the hopes of extending the life of my stencils I choose to leave the adhesive backing in tact and merely tape the stencil onto whatever surface I'm transferring it to with painter's tape. Then once I'm done I can just file the stencil away for future use. You can always choose to take advantage of the adhesive backing and use it to secure your stencil before painting if you prefer. NOTE: If you choose to use the adhesive backing as part of the stenciling process, be sure to draw your image on the non-adhesive side of the contact paper. Otherwise, your image will be backwards when you go to adhere it onto your chosen surface.
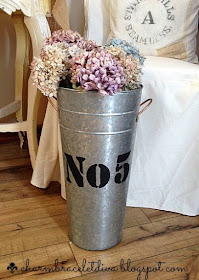
Here's my number "5" stencil, taped up and ready for painting.
I made the "No." stencil myself as well.
Here's the finished product.
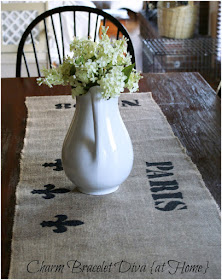
Below are some examples of previous stenciling projects.
(I made stencils for projects 1, 3, 5, 6, 7 and part of 9.)
(Older, less extensive DIY stencil tutorial)

Don’t Forget to Pin It!
Clearly I love to add stenciled goodness to my
home decor accents, and I love the number 5!
I hope I've inspired you to get creative and make some of your own stencils for that next upcoming project. It really is easy once you've done it a few times. It's definitely cheaper, and the possibilities are endless.
What have you stenciled?
Do you make your own?
I'd love to hear about it!
Well, that's it until next time.
Be sure to stay in touch!
Just click on my Facebook, Pinterest, Twitter or Instagram icons in my top right sidebar. You can also sign up there to receive my blog posts via email as well.










I love this tutorial, Kathleen...your projects are great! Thank you for sharing the pattern source, too! Pinned!
ReplyDeleteYou know I love a good inexpensive DIY project, and this is so clever! Love your chair and all your projects too.
ReplyDeleteKathleen you are so crafty and clever! Thank you so very much for linking up on Thoughts of Home on Thursday. You truly added a sweet sparkle of sunshine.
ReplyDeleteThese look great Kathleen! Thanks for joining Home Sweet Home!
ReplyDeletehi there..am looking to make stencils to then use in my journals...instead of using contact l am going to use laminating sheets, that way it is more ridged and l can make it to fit in a side pocket in my journal...l am just looking for patterns to copy onto the laminate...oh, and keep them clear, like no paper in between so that when you use it on a page you can see where you are placing it..
ReplyDeleteThanks for the great tutorial - I can't wait to try it. I love your site and your posts!
ReplyDeleteI knew there must be someway to do it without a machine. thanks for sharing. I'm your newest follower .
ReplyDeleteThis is very smart, and your projects are awesome! I've been looking for a way to DIY my own stencils and haven't come up with anything quite this user-friendly. I am so glad you shared this tutorial. Thank you!!
ReplyDeleteLove your stencilling ideas and just wandering how you can make larger stencils?
ReplyDeletethis is easier than I've been doing. But I don't cut nicely, my letters are wavy!
ReplyDelete