*This post contains affiliate links. A purchase of any of these items helps to support this blog and its creative efforts at no cost to you. To read more, please see my disclosure page.
Finding artwork that represents who you are can
sometimes be hard to find. And by "who you are" I mean your likes,
dislikes, what you believe in, etc. Over the years I've found that the
easiest way to acquire a truly "me" piece of artwork is to make it
myself. To that end, today's project is a tutorial for making your own
Map Coordinates Sign. It's a very personal way to express yourself and
ensure that what you have hanging on your wall is a true representation
of you, your family, and the life that you love.
I chose to create a piece of art based on a place that my family and I love: Galena, Illinois. Many of us have a happy place that if we only think of it we can't help but to smile. For us that place is Galena. You can choose any geographic location your heart desires. Just google it and you'll be able to obtain its' geographical coordinates for your sign.
I started out with a wooden sign with a saying on it I didn't particularly want: "Shiplap Lover." It's technically correct because I do love shiplap but I don't need a sign to tell the world. (I got the sign through a surprise package kind of thing and was bummed when I got it because I really didn't care for it.) But I'm all for upcycling so on to the transformation!
I used some of my Dixie Belle paint in the color Fluff to completely cover the words. I dry-brushed it, using a light hand. It worked out great. Then I was ready for the actual custom coordinate sign-making process.
Supplies For Map Coordinates Sign
- stencils- painter's tape
- heart cookie cutters (optional)
How To Make Your Own DIY Map Coordinates Sign
1. Pick a place. Look it up. Get the geographical coordinates. (Wikipedia works for this.) For those of you not familiar with coordinates, I pulled a short description of the three ways you can write coordinates off of Wikipedia for you:
- degrees minutes seconds : 40° 26′ 46″ N 79° 58′ 56″ W
- degrees decimal minutes: 40° 26.767′ N 79° 58.933′ W
- decimal degrees: 40.446° N 79.982° W
For my sign I chose to use the "degrees minutes seconds" version, for no other reason than I thought it would be the best version to fit nicely within the width of my sign based on the size of stencils that I had.
2. Practice the placement of the numbers and letters by first tracing it all out on paper and then placing the paper onto the surface of the sign to see how it all fits.
3. Once satisfied with placement and spacing, use your paper samples as a guide and begin stenciling one number and/or letter at a time with either Sharpie marker, paint pen or paint brush and acrylic paint. Be sure to situate your stencils onto the work surface with painter's tape as you go to keep them from moving as you fill them in. In my rush to get this done I neglected to take as-you-go pictures. Clearly here I am reenacting stencil placement after the fact.
I initially placed the sign on our new farmhouse style t.v. cabinet, but I felt like something was missing since there was still empty space on either side of the sign.
5. To solve the empty space problem I chose to add an additional image to the sign. I chose a simple heart. I got my heart "stencil" by googling the words "free heart stencil" and a ton of options came up. I printed out the one I thought was the best size, cut it out and placed it on the sign to get an idea as to how it would look as seen above.
I also remembered that I had heart-shaped cookie cutters so I used one of those as well and liked it better so I went with it.
I just placed the cookie cutter where I wanted the heart to be and then traced around the inside of it with a Sharpie marker. After filling it in with the Sharpie, my sign was complete.
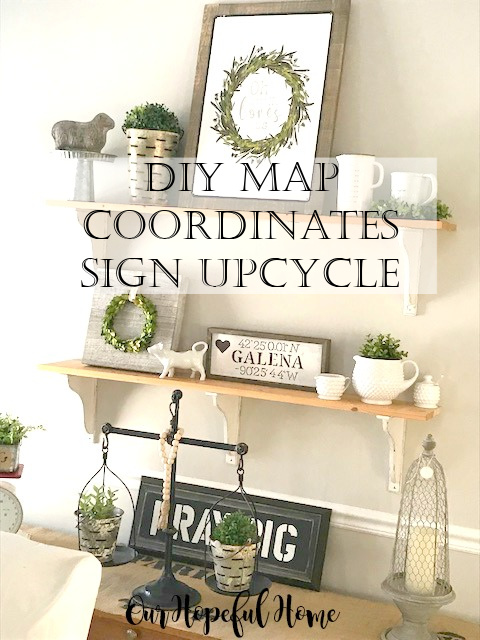
It ended up being the final piece in my farmhouse shelves vignette, bringing it all together from a cohesiveness standpoint. I had been waiting for that one special piece I couldn't put my finger on but knew was missing.

I love these two farmhouse measuring cups. The one on the left is enamelware and the one on the right is porcelain.
I'm also a huge hobnail fan so this pitcher, creamer and sugar bowl are near and dear to my heart.
I love being able to move my DIY "Pray Big" farmhouse sign all around the house. For now I think it's perfect right here.
I am so loving my DIY farmhouse shelves, having fun styling them for the winter months ahead. I think the Galena sign adds just the right touch, don't you?

Well, that's it for today, friends!
I hope you've enjoyed reading about my
DIY Map Coordinates Sign Upcycle
and that I've inspired you in some way.


That was a great way to re-use the sign, Kathleen! Your shelf vignette is so pretty! Stay warm!
ReplyDeleteSuch a fun idea, Kathleen! Looks great!
ReplyDeleteI agree that your sign is a perfect touch for your vignette. Now I have to stop and think about where my favorite place would be; I have several vying for top spot! Stay warm!
ReplyDeleteThat's a lovely Idea, I'm thinking you could also do that with HOME and your coordinates for your home.
ReplyDeleteI am a sign lover and this one is fantastic! I am going to make one like this too! Happy Crafting, Kippi #kippiathome
ReplyDelete