I was invited to participate in a monthly bloggers' challenge by a group of very talented women known as The Thrifty Chicks! This month's theme is small furniture. I had no trouble finding a piece to re-love -- can you say flea market French provincial side table? So stick around to see not only my small furniture transformation, but those of my talented friends as well! Also, I'll be sharing a little-known DIY furniture distressing technique you won't want to miss!
This post contains affiliate links. A purchase of any one of these items helps to support this blog and its creative efforts at no cost to you. To read more, please see my disclosure page.
A few years back I purchased two vintage tables from the Kane County Flea Market in a nearby town. The flea market has been rated one of the best in the country, and we're lucky to have it so close by. The tables were painted duck egg blue, and for a while that worked for me.
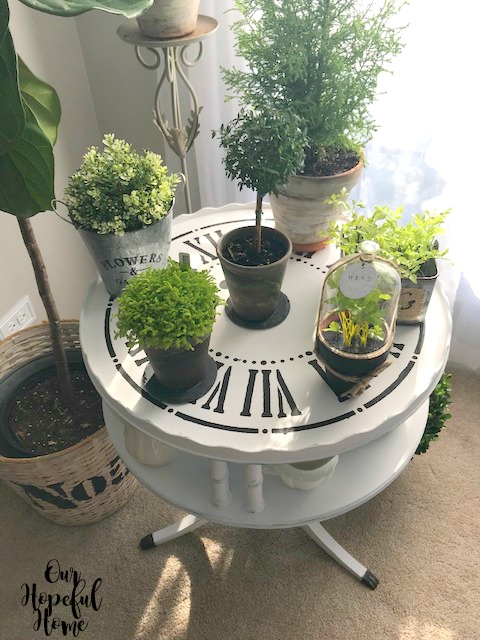
Eventually I got tired of the blue on the larger, round table so I transformed it into a white, French farmhouse clock table. Be sure to stop by my clock table tutorial to get all the details for that project. And ever since I transformed that one into a white clock table, I've been hankering to paint the smaller of the two tables as well. So this seemed the perfect time to use it as my first Thrifty Chicks challenge of the year.
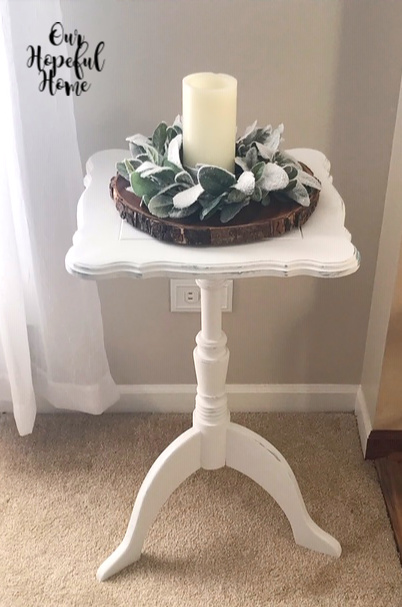
So here it is. After a little research I learned that the shape and design is quite similar to antique Chippendale serpentine tilt-top tea tables.The Chippendale tables were larger, made of mahogany and actually tilted so that the top flipped up and rested flat when not in use.
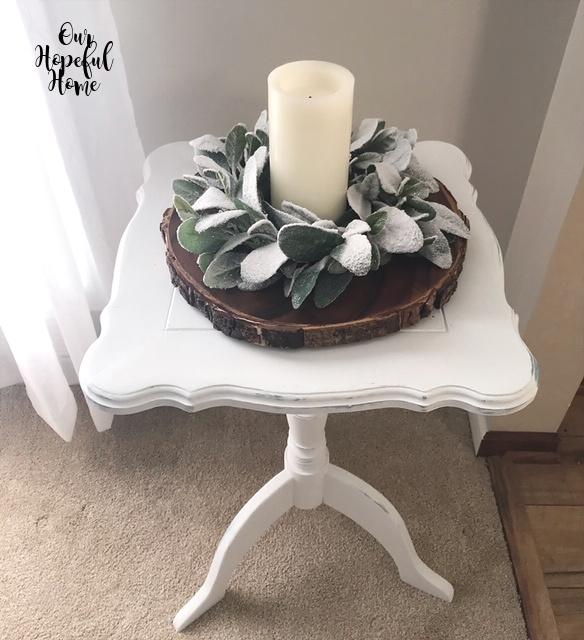
They were usually round, but some were also made in square form with serpentine edged tops like this one. I do think the detailed edge and unusual one column, or leg, with three supports is what drew me to it in the first place. Despite my research pointing in the American Chippendale direction, I still think of it as a French provincial reproduction due to to the serpentine top and the three curvy legs, or supports.
It really had that je ne sais quois of a French provincial side table going for it, non?
Paint Selection

I used my trusty Rust-Oleum Chalked ultra matte paint in Linen White to transform this piece. Normally, I only need to do two coats with this paint, but for some reason the top of the table was a real pain and needed three coats to completely cover the blue. It might be because the table top was covered in a leather-like material and seemed to resist the chalk paint somewhat. There was also a stain involved, as explained below. The rest of the piece only needed two coats.
My New Secret To Distressing Chalk-Painted Furniture -- An Alternative To Traditional Distressing Techniques
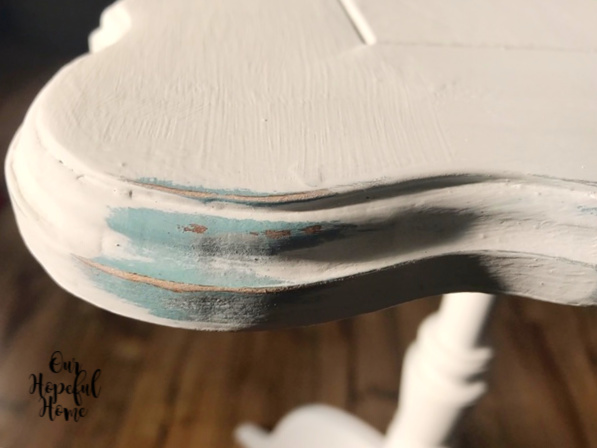
Once the paint dried I distressed the table with something I've never used before: A Mr. Clean Magic Eraser! It was totally by accident that I figured out it can be used to distress furniture in certain instances. So how did it happen?
How I Literally Stumbled Upon Using Magic Erasers To Distress Furniture
After two coats of white paint it looked like I had somehow left a stain on the newly painted table top, so I thought maybe I could "erase" whatever it was and avoid having to do a third coat of white to cover it up. So I pulled out my trusty Magic Eraser and guess what? It not only took off the stain, it even took off some of the white paint, leaving a nice distressed look. In the end, the Magic Eraser helped me to rub off two colors of paint -- my eventual 3 white coats and the previous blue -- down to the original wood in some places, leaving me with just the right amount of distressing.
While I know the sponge's intended purpose was NOT to remove paint (rather, it was intended to remove unwanted marks from painted walls) that's what happened here. I'm sure it worked in large part because I used Rust-Oleum's Chalked ultra matte paint and did not seal it with wax. Either way, I was thrilled that I didn't have to use messy sandpaper to achieve the look I was going for, and it only took a few minutes to achieve.
Tips For Using the Magic Eraser Distressing Technique:
1. Don't forget to wet the sponge as noted on the package directions before beginning or it won't work.
2. Also, I cut the sponge up into a few pieces and used those smaller pieces for the distress work. That ensured I didn't over-distress in any one area with a full-sized sponge.
3. Even though it's way easier and less messy than using traditional sand paper, the sponge can still end up disintegrating on you if you use it hard enough and long enough. In that case you'll want something under your work space like newspaper or a dropcloth.
You can find my posts on some other non-traditional methods of distressing painted furniture here:
1. How To Faux Distress With Plaid Layering Block
2. How To Distress Furniture With Vaseline
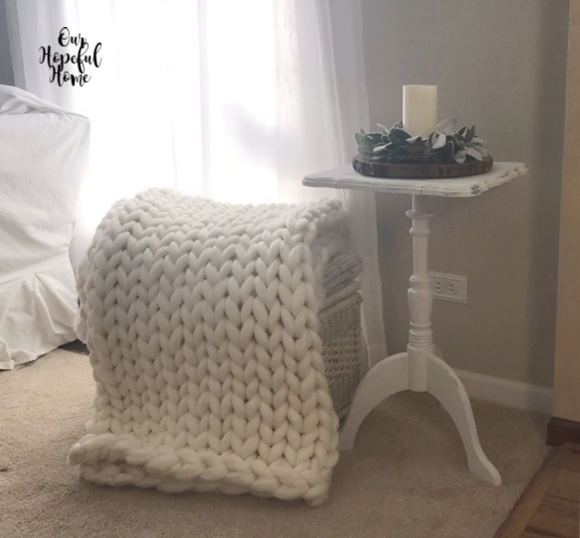
I love the look of my large, rustic wood slice on top of the white table, and the color contrast it creates.
The snow-dusted eucalyptus candle ring is one of my favorite most recent finds (I picked up two for 50% off each at Hobby Lobby). It worked well as Christmas decor and will continue to shine throughout the winter, especially with a big, remote-controlled LED candle with timer sitting inside it!
I couldn't help but to add a little hygge to this spot, in the form of my new chunky knit throw! My dear husband gave it to me for Christmas and I absolutely love it. I'm so overprotective of it my family thinks I'm nuts! It's the only blanket in the house that I won't let our dog lie on.
In addition to the large wood slice, I also added some extra large, frosted pine cones on the round, wooden, farmhouse mirrored shelf above the table.The pine cones add even more texture to this corner, and I'm so pleased with the new post-Christmas look that I think it'll just have to stay like this throughout the winter. (I'll figure out what to do with my every day couch side table eventually lol.)
I want to thank my friends for inviting me to participate in this monthly challenge, and I look forward to many more fun challenges this year, so stay tuned! Be sure to stop by their posts below and give them some love.
Well, that's it until next time, friends!
I hope you've enjoyed reading about my
I hope you've enjoyed reading about my
French Provincial Table Makeover.







Leave a Comment!
I love the stool! I had heard someone else say that they used a Magic Eraser. I have a coffee table that I would like to do something else with. I might have to just try changing the colors on it.
Slatersfunnyfarm.blogspot.com
Your table turned out beautifully, Kathleen, and you styled it in such a lovely way! Love the distressing tip, too! The bits of blue look great showing through the white! So nice to have you join us at Thrifty Chicks!
Hi Kathleen,
I really love this Re Love of the table and the little bit of blue coming through. Gorgeous. I like the shape of that table too. Have a great new week.
Hugs,
Kris
Kathleen,
Love this little table and the change. Thanks for the Magic Eraser info for this painting girl.
Cindy
Love the tip about the Magic Eraser; I hate sandpaper! I love how the wood and blue show through just a bit. I have found that I can "sand"--probably buff is a better word--my small painted wooden dollhouse pieces with a piece from a brown paper bag. ANYTHING to avoid sandpaper and stress on old arthritic joints!
Great transformation, Kathleen! And I love how you styled it simply for winter. I've never even purchased a magic eraser, but now you've got me convinced I need to tap into it's secret powers;) So excited that you can join us!
I love your little table makeover! I'm definitely going to try the magic eraser trick now too, thanks for that tip!
I'm so glad you decided to join the thrifty chicks, I hope you enjoyed it!
Tania
I really love what you've done with this pretty little table Kathleen. The blue peeking through is so pretty, and you've featured it perfectly. It's so nice to have you on board with the Thrifty Chicks. Welcome!!
Great tip--and one I haven't seen before! I'll try it next time I distress. Thanks!
Hi there I love that little table. But I cannot help wondering how beautiful it would look if stripped back to the original wood. I'm a bit old fashioned like that. But I have to say that you did a great job with the distressing and it looked amazing in your surroundings. Just out of curiosity, do you know what wood it is actually made from ? And what colour the original wood was ? Thank you Phil
Post a Comment