Today I'm sharing how to make corbel bookends by repurposing drapery wall sconces.
Okay, you all know how much I love vintage architectural salvage pieces, right? I've even been known to pick through piles of splintery wood looking for Just. That. Piece. And yes, I even stashed a flea market vintage baluster in my suitcase for my flight home from Nashville a few years ago.
This post contains affiliate links. A purchase of any one of these items
helps to support this blog and its creative efforts at no cost to you.
To read more, please see my disclosure page.
You can read about that adventure in Thrill of the Hunt #83. It's pretty obvious that the chippier, the better, in this house!
This project began many months ago when I came across these drapery wall sconces at Goodwill for $2.99 apiece.
I was so excited I didn't even notice they had large HOLES in them! How does that happen? Hello. I had never really noticed "drapery sconces" before so I was innocently thinking that I got some corbels I could use for shelves or maybe as bookends. I had experience making DIY rustic corbel French farmhouse shelves, and corbels have become my thing. So I just grabbed them and ran. I'd figure out what to do with them later. Do you ever do that?
The problem is that when I got them home and actually looked at them, I noticed the holes and said to myself, "Crap." I learned through my research that the large holes were there to place your curtain rods through! Pretty fancy, huh? Just not what I wanted them for.
Those holes certainly put a wrench in my plans. Who wants to look at those holes? So the wheels in my brain started turning as I thought of possible ways of "filling" the holes. That's when I realized I was on my own here. And that I had to come up with an out of the box solution.
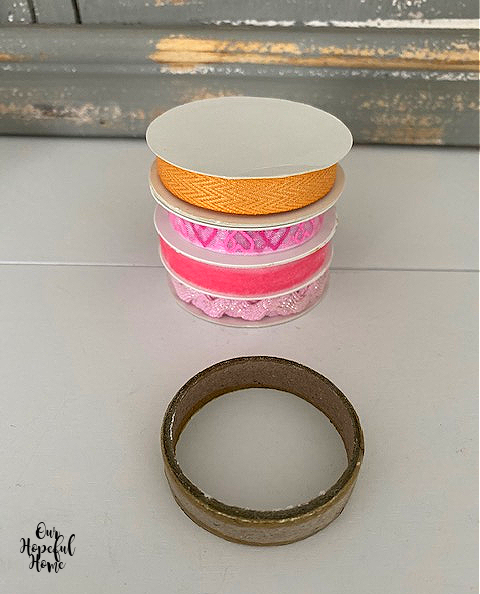
So I started looking around my crafting stash for something I could use as a circle template that was the same size as the sconce opening.
Turns out that my small rolls of ribbon seemed to be just the size I needed.
I placed the ribbon ring onto cardboard and traced the inside of the ring. Then I painted the corbels and the cardboard rounds with my favorite go-paint, Rust-Oleum Chalked Ultra Matte Paint in Linen White.
Once the corbels were dry I filled the center holes with some folded batting (cutting it down to fit).
I then used hot glue to adhere the cardboard rounds to the batting, one side at a time.
Here is one corbel filled with just the unpainted cardboard round and no spackle, compared to the empty one on the right. From this distance the filled one looked pretty good, but in person it left a lot to be desired -- which is why I added the paint and the spackle.
Once I was satisfied with the placement of the cardboard round and the paint was dry I got out my wall mending agent a.k.a. spackle and got to work. The hope was to fill in the remaining shallow area and smooth it over to completely fill up the hole.
In theory this was a great idea. In practice, not so much. I was wholly disappointed by the appearance of the spackle once it dried. I'm afraid if I try to sand it smooth I'll ruin the whole thing (it's already started to crack). But unless and until I can come up with a better idea for filling those holes it will have to do. I am certainly open to suggestions.
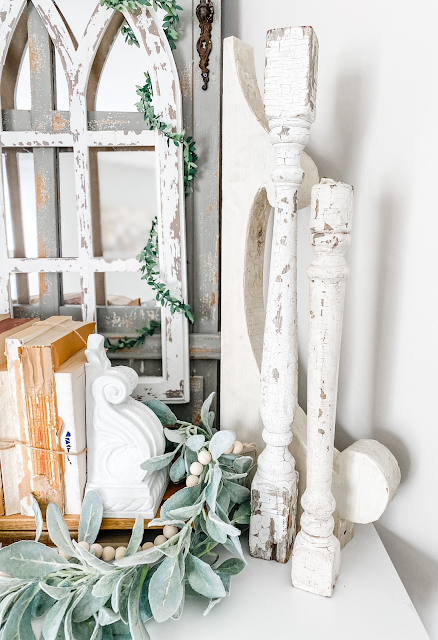
However, I have to say when I placed the finished corbels into this vignette with my deconstructed book bundles and oversized vintage corbels I was more than happy with how they look.
Chippy shabby balusters add a lovely rustic and textural element to the vignette.
I added lambs ear garland and a farmhouse wood bead garland into the mix.
I also added a few wooden cutting boards to give the books some height.
I love mixing different architectural elements to make a statement. The oversized corbels on either end of the vignette came with a fabulous history which I can't wait to share with you in an upcoming Thrill of the Hunt post.
Well, that's it until next time, friends!
I hope you enjoyed reading about
DIY Corbel Bookends
and that I've inspired you in some way.
Be sure to stay in touch:

Click HERE to subscribe.


Leave a Comment!
Kathleen you are so crafty. What a great idea to make these drapery corbels regular corbels and then re loved into bookends. Genius. They look awesome. Have a great week. xoxo Kris
I agree with you; I didn't like them til you got them into position. Maybe you can find a round wooden circle with a design pressed into it; I don't know what they are called and spackle and paint again!
Fabulous and elegant as always and being featured when my party opens up tonight!
What a bargain Kathleen and I think you've managed to fill the hole in perfectly. I love this vintage vignette!!
Thanks for sharing your corbel project at Create, Bake, Grow & Gather this week. I'm delighted to be featuring it at tonight's party and pinning too.
Hugs,
Kerryanne
Just an idea on the circle part that you are not happy with... you could use a stencil to do a raised texture pattern over the top using texture paste and then paint it. :)
I love how you patched the hole in the corbel!! BRILLIANT!!
I’d love for you to join us over at the Creative Crafts Linky Party every Wednesday through Sunday
https://creativelybeth.com/creative-crafts-linky-party-39/
Followed and Pinned! 🙂
Creatively, Beth
I love projects that become a process because in my opinion they turn out the best. Love your corbels, I’ve been searching for this exact thing for my curtains lol!
Post a Comment